6/21/12

A Little Upgrade


Finally got tired of our makeshift canopy weights we've used for the past six years. They did the job, but, as the   display slowly developed into a more art show friendly appearance, they started to look out of place. I had seen other artisans' weights made out of PVC pipe and cement, so I decided to make some myself. Went to the local home improvement store and purchased a ten foot length of 3" diameter PVC pipe (that the store associate cut into 4 pieces), 4 long (8"?) eye hooks and 2 bags of quick mix cement (not pictured; you probably know what that looks like).
I was going to get 4 end caps for them, but they were rounded, plus they were about $5.00 each! Instead, I found what are called "knock out caps" - much thinner and they fit into the ends instead of over them. Those happened to be less than a dollar apiece, which reduced the cost of the project considerably!
 I already had some PVC pipe glue and large washers (so the eye hooks would be more secure), and, of course - after casting around 1,000 pieces so far, I think I'm pretty good at mixing cement! 
Of course, even after gluing the thin caps into the ends, I knew they could be in danger of being loosened by the weight of the cement before it cured, so I made sure the pipes were secured and sitting flat before I filled them.
So here they are! I had filed the ends to level them and to remove the excess burrs from the hacksaw used to cut them. I also cleaned off the black lettering on them using nail polish remover (hey, it's what I had!), and added some glass marbles to the raw cement on top (notice they are shaped like LEAVES).


The only thing that didn't turn out as planned was the weight of each one - they weren't as heavy as I would have liked - about 20 lbs., whereas the round weights totaled about 24 lbs. each corner. I hope the shape will provide more stability, though, and offset the lighter weight. They LOOK a lot nicer, though! My total cost was under $25.00.

6/18/12

Dasken Designs: 10 Tips for Outdoor Craft Shows

I'm linking to this page because it's a LOT of info for setting up at craft/art shows and very informative! Wish I would have had this resource when I was a newbie!
Note: this post is a couple years old, the credit card processing info may be outdated due to the advent of the Square and the Intuit processing companies, which are incredibly easier!

Dasken Designs: 10 Tips for Outdoor Craft Shows

6/6/12

Bartering Our Talents

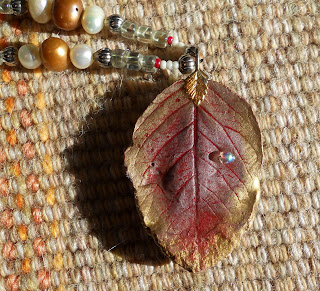
So, a new acquaintance of mine (a friend of my SIL) sews (one thing I DON'T do), and in talking with her, I discovered she makes purses / handbags. I requested one with leaves on it (oh, gosh, what a surprise, huh?), and she did a wonderful job! 

She knows the work I do, so when she was finished with the purse, she had a request: to trade for a casting of a leaf that she had found on a beach during her Florida vacation, and to add the phrase, "Florida 2012" somewhere on it. 


Well, casting a leaf wasn't a problem (since I have cast about a thousand so far!), but how do I add words to it? I didn't want to put them anywhere ON the leaf, since it wasn't very large, so I decided to cast it as a "fossil" plaque, and to use some rubber stamps I had found a while ago (but never used).


Here's the leaf itself on its sand bed. This had to work the first time, since there was only that one leaf - and even I don't know what plant it came from! 
The leaf itself had a seriously odd coloration, as well, and it was kind of a job to match that color.


BUT, here is the finished product, and I think it turned out pretty darn good! The trade was made, and we were both happy!

5/25/12

Leaves of Love

***Attention, animal people!***
 I am officially launching a new idea, brought about by my wanting to help a Facebook friend. Sadly, her cat had been poisoned by a neighbor. She has a little girl, who had understandably been devastated by this incident. I really wanted to do something to help them a little, but what could I do? The answer came to me when they were told that the animal would have to be cremated because burying the poisoned remains could contaminate the ground. I thought, why couldn't I cast a (catnip) leaf pendant for her daughter, and incorporate some of their kitty's ashes right inside of it (since it would last forever)? So I offered to do just that!  


The more I thought about it, I knew I would really love to have created something like that for my own pets, (even though I have never had any of them cremated), and will probably do so in the future, when my kitties cross the Rainbow Bridge. I could even embed a tiny tuft of fur, or a whisker, a piece of a favorite toy, whatever.
 A Catnip leaf for felines, or a Dogwood leaf for canines! If your dog had a favorite tree to lay under, or if your cat always sat on a branch of "their" tree, I could even use a leaf from that actual plant! 

If not a pendant, I could incorporate the ashes (or ?) into a small leaf to hang on a wall or fence instead, with, of course, the pet's name on the back inside a heart   Whatever the pet owner would want! I'm very excited by this idea and would love feedback from you all ~ please let me know what you think!  

4/8/12


Hope You All Have A Happy, Peep Filled Easter!


4/6/12

Challenges


This was a first for me ~ I received an email from a young lady who purchased a Rose Leaf necklace from me at a show, and discovered after she had moved that the leaf had broken. She asked if there was anything I could do to fix it. I told her I didn't think I could, except to replace the casting completely or file the edges down and repaint it, so she requested I try the latter solution and sent it to me.


After I took a closer look, I didn't feel that filing it down would have looked good. If I had both parts, it's much easier to mend - but I did not. So what was I going to do with this now that I had it?
After mulling it over, I decided I would try to rebuild the missing piece with the same material. This is what it looked like...

After I shaped it, matched the paint (that was the hard part!), and polyurethaned it (is that a word?), it turned out very well! Perfect? Not really, but my customer is very happy with it and I am confident that when she wears it, the only two people who will know it's been mended will be the two of us!


2/11/12

Bottles Full Of Dreams

Throughout my life I have involved myself in many types of arts and crafts - back in the day when I seemed to have a lot more free time - jewelry, painting, crochet (although I don't dig fabric and fiber all that much anymore), polymer clay, wire wrapping, ceramics, (and still some hope to be working with glass someday)! Totally right brained! Since then I have since thrown myself fully into the leaf casting, and a lot of the rest of this work was set aside.

But, 16 years ago ,when my husband was diagnosed with cancer, and I had to give him injections of Neupogen, which came in extremely tiny bottles, I felt I needed to do something positive with these expensive little vials of glass, something that would give my mind an activity besides worrying (FYI, hubby's doing very well these days!). I started to use the bottles as a base for bead weaving, and came up with this-
Total height is 1 3/4 inches, plus the seed beads are size 14/0, which is much smaller than the average bead 11/0 (like what you would find on Native American beadwork). The higher the number,the smaller the bead. I actually have some size 22/0, but have never been brave (or crazy) enough to work with them!

Plus a polymer clay stopper to match. 

Several more followed, no patterns used, just whatever I felt at the time. This was a later attempt...that's a Quarter it's sitting on!


This next one is still my favorite-
 Yes, I actually beaded myself a snake, complete with a little "basket" for it to stay in!
 The snake is totally separate, beaded on poseable wire
 Isn't he cute?
Even the bottom's beaded!

...I found other bottles for beading, like this Tabasco sample (YES, I washed it out very well!)
From this....


...To this....


And more polymer clay formed onto the top - for this slightly larger one I used size 11/0 beads

I found these two great little bottles with jeweled caps at some flea market. They are actually NOT finished (I want to bead the bottoms), so you might catch a glimpse of a thread here and there. 14/0 or 15/0 beads.

Another great bottle, which I'm a little disappointed in - I used high quality seed beads on this, and the pink color you see is the blue beads' color lining seeping into the white! Don't think there is any correcting it, though =-(


Of course,this went on long after the spousal unit felt better - I was on a roll! This one is wearable and is on a chain. I called it a Treasure Bottle, and was so proud of it till said spousal unit blurted out,  "Hey, looks like a coke bottle!" Uh, no, he didn't mean the soft drink! Anyway, that wasn't my artistic intention behind this project :-}


Can't  recall where this little glass tube and stopper was found, but it was just the right size for my beading needles! 

For this one, I didn't need to go around any curves, so I used Japanese Delica seed beads, which are shaped like tiny cylinders and are very uniform.

The stopper was also embellished with a polymer clay flower. I have used this for my needles (hey, that could go with the coke bottle!... I'm KIDDING!) for several years now.
.